Cutting Spectra


Cutting Spectra |
|
|
THE SPECTRUM CUTTING TOOL
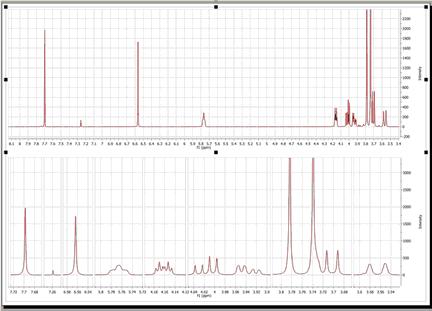
This is a tool that most Mnova users will not have seen before (with the notable exception of iNMR users). It is important to note that this tool is in no way related to the "copy", "cut" and "Paste" object manipulating tools found in this and most Windows programs as Icons and in the Edit drop-down window. The 'Cutting' tool allows the user to create dark regions, i.e., to hide areas of the spectrum the user is not interested in seeing (these could be noise regions or other regions which are of no interest at a specific time). By hiding these regions, areas of interest become larger on the screen without a need to create numerous expansion windows. The Cutting Tool is basically a way of split zooming, as opposed to the more limited traditional zooming in a single block. The hidden areas are shown on the scale and on the grid. The software also implements an Auto Cut tool, which will hide all noise-only regions of the spectrum at the click of one button.
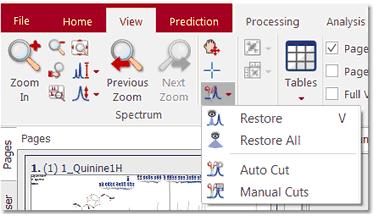
It is important to stress that this tool is not eliminating the information, but simply not displaying it. The 'Cut' and 'Auto Cut' options are available from following the menu item 'View/Cuts/Cut' or 'View/Cuts/Auto Cut'. Manual cutting can also be accessed by clicking on the 'Cut' icon (or simply, by pressing the <X> key) as can be seen in the figure below. Auto Cut can be accessed via the drop-down menu which can be displayed by clicking on the side-bar of the Cutting Icon.
You can restore one specific region ('Restore', or <V> key), a limited region ('Manual Restore') or all regions ('Restore All'). These options can be selected from the menu 'View/Cuts/Restore', 'View/Cuts/Manual Restore' and 'View/Cuts/Restore All' or by selecting 'Restore', 'Manual Restore' or 'Restore All' in the scroll menu shown in the figure below.
By the way, you should also note that the 'Cut' mode is available in 2D, along direct, indirect or both dimensions. Once again, switching between modes is achieved by simply pressing the <X> key.
The cutting tool is aware of dimension and nucleus of the selected items. For example, if you have selected several pages in the same document (i.e 1H, 13C, COSY and HSQC):
- If you cut the 1H spectrum: the cut will be applied to the HSQC in the f2 dimension, and to the COSY in both dimensions. - If you cut the 13C spectrum: the cut will be applied to the HSQC in the f1 dimension. - If you cut the COSY (in both dimensions): the cuts in f1 and f2 will be applied to the HSQC in f2 dimension and to the 1H spectrum. The 13C spectrum will be unaltered. - If you cut the HSQC (in both dimensions): the cut in f1 will be applied to the 13C spectrum, the cut in f2 will be applied to the 1H spectrum, and to both dimensions in the COSY.
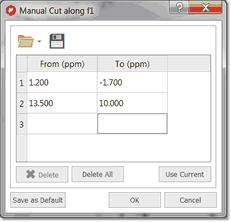
Manual Cutting
The user will be also able to use the 'Manual Cut' to select the limits of the dark regions.
The user will be able to predefine the cuts ranges to automate the cutting analysis. Clicking on OK, will cut the current spectrum with the desired ranges and keep the regions to apply further cuts to additional spectra. The user will be able to save these regions for later uses, by clicking on the 'Save Cuts' icon |